

English | 简体中文
gitee: https://gitee.com/pixelmax/gin-vue-admin
github: https://github.com/flipped-aurora/gin-vue-admin
Project Guidelines
Online Documentation : https://www.gin-vue-admin.com/
From the environment to the deployment of teaching videos
Development Steps (Contributor: LLemonGreen And Fann)
1. Basic Introduction
1.1 Project Introduction
Gin-vue-admin is a backstage management system based on vue and gin, which separates the front and rear of the full stack. It integrates jwt authentication, dynamic routing, dynamic menu, casbin authentication, form generator, code generator and other functions. It provides a variety of sample files, allowing you to focus more time on business development.
Online Demo: http://demo.gin-vue-admin.com
username:admin
password:123456
1.2 Contributing Guide
Hi! Thank you for choosing gin-vue-admin.
Gin-vue-admin is a full-stack (frontend and backend separation) framework for developers, designers and product managers.
We are excited that you are interested in contributing to gin-vue-admin. Before submitting your contribution though, please make sure to take a moment and read through the following guidelines.
1.2.1 Issue Guidelines
-
Issues are exclusively for bug reports, feature requests and design-related topics. Other questions may be closed directly. If any questions come up when you are using Element, please hit Gitter for help.
-
Before submitting an issue, please check if similar problems have already been issued.
1.2.2 Pull Request Guidelines
-
Fork this repository to your own account. Do not create branches here.
-
Commit info should be formatted as
[File Name]: Info about commit.(e.g.README.md: Fix xxx bug) -
Make sure PRs are created to
developbranch instead ofmasterbranch. -
If your PR fixes a bug, please provide a description about the related bug.
-
Merging a PR takes two maintainers: one approves the changes after reviewing, and then the other reviews and merges.
1.3 Version list
- master: 2.0 code, for prod
- develop: 2.0 dev code, for test
- gin-vue-admin_v2_dev (v2.0 GormV1 Stable branch)
- gva_gormv2_dev (v2.0 GormV2 Development branch)
2. Getting started
- node version > v8.6.0
- golang version >= v1.14
- IDE recommendation: Goland
- initialization project: different versions of the database are not initialized. See synonyms at initialization https://www.gin-vue-admin.com/docs/first
- Replace the Qiniuyun public key, private key, warehouse name and default url address in the project to avoid data confusion in the test file.
2.1 server project
use Goland And other editing tools,open server catalogue,You can't open it. gin-vue-admin root directory
# clone the project
git clone https://github.com/flipped-aurora/gin-vue-admin.git

# open server catalogue
cd server

# use go mod And install the go dependency package
go generate

# Compile
go build -o server main.go (windows the compile command is go build -o server.exe main.go )

# Run binary
./server (windows The run command is server.exe)
2.1 web project
# enter the project directory
cd web

# install dependency
npm install

# develop
npm run serve
2.2 Server
# using go.mod

# install go modules
go list (go mod tidy)

# build the server
go build
2.3 API docs auto-generation using swagger
2.3.1 install swagger
(1) Using VPN or outside mainland China
go get -u github.com/swaggo/swag/cmd/swag
(2) In mainland China
In mainland China, access to go.org/x is prohibited,we recommend goproxy.io or goproxy.cn
# If you are using a version of Go 1.13 - 1.15 Need to set up manually GO111MODULE=on, The opening mode is as follows, If your Go version is 1.16 ~ Latest edition You can ignore the following step one
# Step one、Enable Go Modules Function
go env -w GO111MODULE=on
# Step two、Configuration GOPROXY Environment variable
go env -w GOPROXY=https://goproxy.cn,https://goproxy.io,direct

# If you dislike trouble,You can use the go generate Automatically execute code before compilation, But this can't be used command line terminal of `Goland` or `Vscode`
cd server
go generate -run "go env -w .*?"

# 使用如下命令下载swag
go get -u github.com/swaggo/swag/cmd/swag
2.3.2 API docs generation
cd server
swag init
After executing the above command,server directory will appear in the docs folder
docs.go,swagger.json,swagger.yamlThree file updates,After starting the go service, type in the browser http://localhost:8888/swagger/index.html You can view swagger document
3. Technical selection
- Frontend: using Element based on Vue�,to code the page.
- Backend: using Gin to quickly build basic RESTful API. Ginis a web framework written in Go (Golang).
- DB:
MySql(5.6.44),using gorm` to implement data manipulation, added support for SQLite databases. - Cache: using
Redisto implement the recording of the JWT token of the currently active user and implement the multi-login restriction. - API: using Swagger to auto generate APIs docs。
- Config: using fsnotify and viper to implement
yamlconfig file。 - Log: using zap record logs。
4. Project Architecture
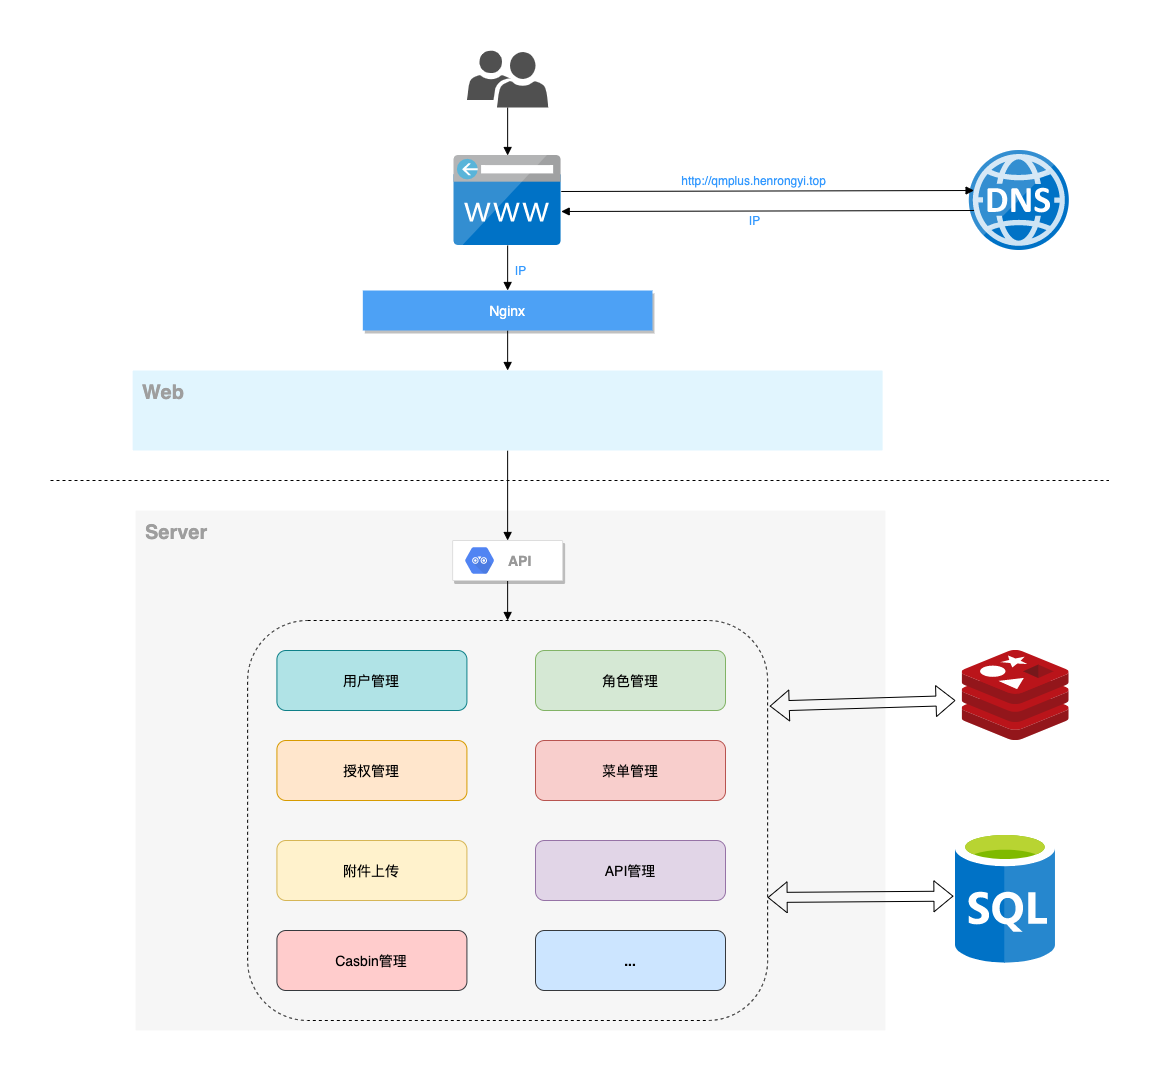
4.1 Architecture Diagram

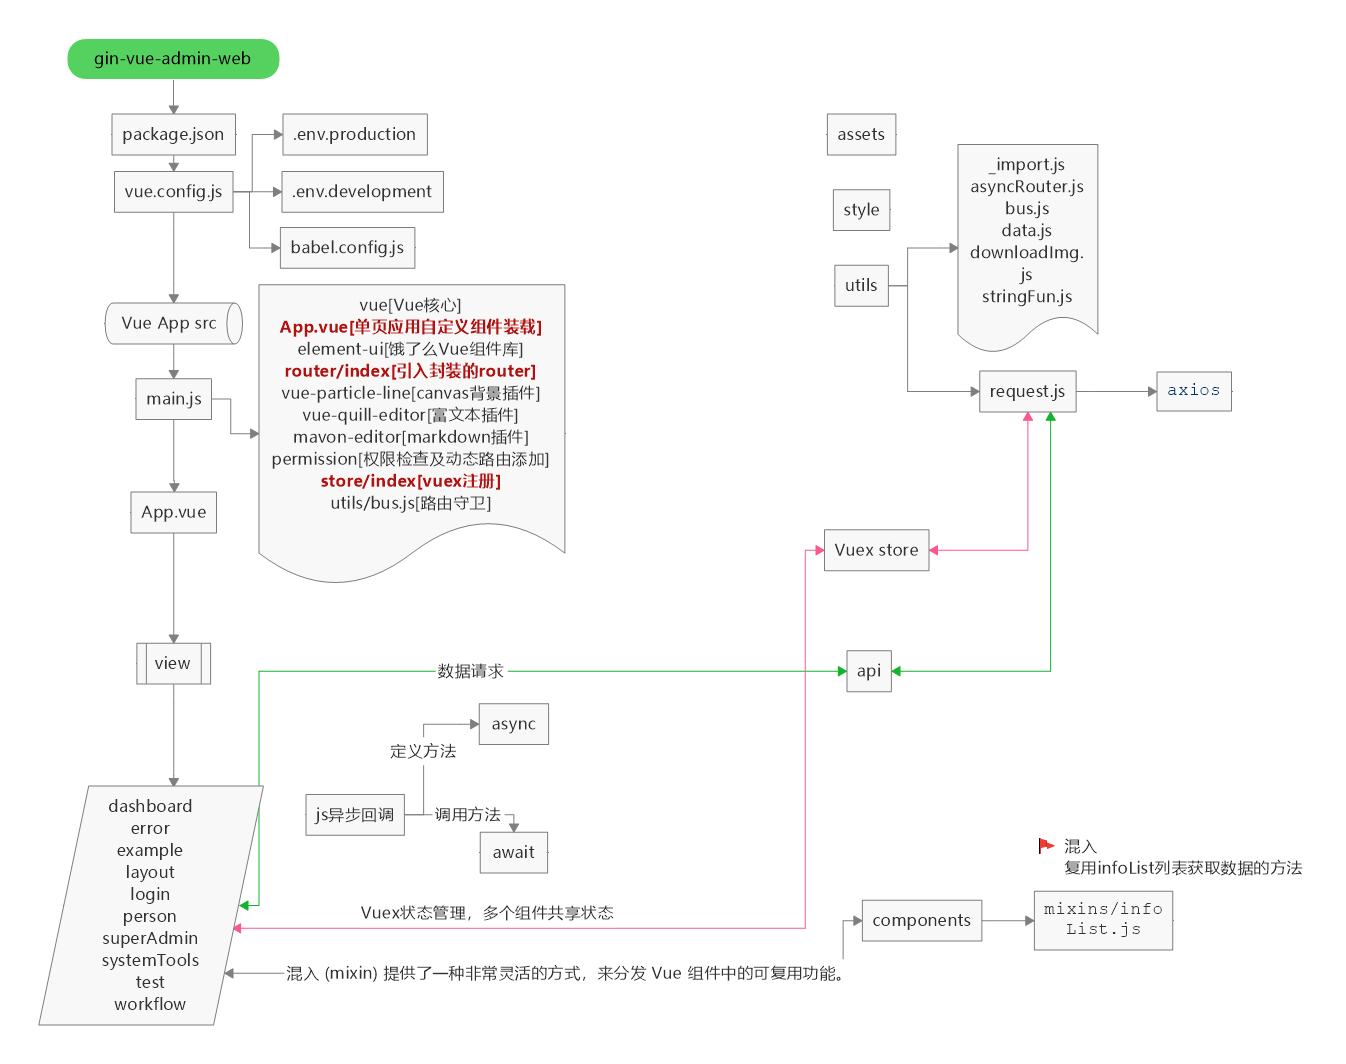
4.2 Front-end Detailed Design Diagram (Contributor: baobeisuper)

4.3 Project Layout
    ├── server
        ├── api             (api entrance)
        │   └── v1          (v1 version interface)
        ├── config          (configuration package)
        ├── core            (core document)
        ├── docs            (swagger document directory)
        ├── global          (global object)
        ├── initialize      (initialization)
        │   └── internal    (initialize internal function)
        ├── middleware      (middleware layer)
        ├── model           (model layer)
        │   ├── request     (input parameter structure)
        │   └── response    (out-of-parameter structure)
        ├── packfile        (static file packaging)
        ├── resource        (static resource folder)
        │   ├── excel       (excel import and export default path)
        │   ├── page        (form generator)
        │   └── template    (template)
        ├── router          (routing layer)
        ├── service         (service layer)
        ├── source          (source layer)
        └── utils           (tool kit)
            ├── timer       (timer interface encapsulation)
            └── upload      (oss interface encapsulation)

    └─web            (frontend)
        ├─public        (deploy templates)
        └─src           (source code)
            ├─api       (frontend APIs)
            ├─assets	(static files)
            ├─components(components)
            ├─router	(frontend routers)
            ├─store     (vuex state management)
            ├─style     (common styles)
            ├─utils     (frontend common utilitie)
            └─view      (pages)
5. Features
- Authority management: Authority management based on
jwtandcasbin. - File upload and download: implement file upload operations based on
Qiniuyun',Aliyun 'andTencent Cloud(please develop your own application for each platform corresponding totokenorkey). - Pagination Encapsulation:The frontend uses
mixinsto encapsulate paging, and the paging method can callmixins. - User management: The system administrator assigns user roles and role permissions.
- Role management: Create the main object of permission control, and then assign different API permissions and menu permissions to the role.
- Menu management: User dynamic menu configuration implementation, assigning different menus to different roles.
- API management: Different users can call different API permissions.
- Configuration management: the configuration file can be modified in the foreground (this feature is not available in the online experience site).
- Conditional search: Add an example of conditional search.
- Restful example: You can see sample APIs in user management module.
- Front-end file reference: web/src/view/superAdmin/api/api.vue.
- Stage reference: server/router/sys_api.go.
- Multi-login restriction: Change
user-multipointto true insysteminconfig.yaml(You need to configure redis and redis parameters yourself. During the test period, please report in time if there is a bug). - Upload file by chunk:Provides examples of file upload and large file upload by chunk.
- Form Builder:With the help of @form-generator.
- Code generator: Providing backend with basic logic and simple curd code generator.
6. Knowledge base
6.1 Team blog
https://www.yuque.com/flipped-aurora
There are video courses about frontend framework in our blo. If you think the project is helpful to you, you can add my personal WeChat:shouzi_1994,your comments is welcomed。
6.2 Video courses
(1) Development environment course
(2) Template course
(3) 2.0 version introduction and development experience
Bilibili:https://www.bilibili.com/video/BV1aV411d7Gm#reply2831798461
(4) Golang basic course
https://space.bilibili.com/322210472/channel/detail?cid=108884
(5) gin frame basic teaching
bilibili:https://space.bilibili.com/322210472/channel/detail?cid=126418&ctype=0
(6) gin-vue-admin version update introduction video
bilibili:https://space.bilibili.com/322210472/channel/detail?cid=126418&ctype=0
7.Contacts
7.1 Groups
QQ group: 622360840
| QQ group |d
| :---: |
|  |
|
Wechat group: comment "加入gin-vue-admin交流群"
 |
About Us
8. Contributors
Thank you for considering your contribution to gin-vue-admin!
9. Donate
If you find this project useful, you can buy author a glass of juice 🍹 here
10. Commercial considerations
If you use this project for commercial purposes, please comply with the Apache2.0 agreement and retain the author's technical support statement.